
Google Earth Pages > Google Earth Templates for a College Campus
Google Earth Template
David N. Israel
Educational Research & Development
Bowdoin College
Brunswick, Maine
disrael@bowdoin.edu
So, I created a Google Earth Map of the Bowdoin College campus (where I work in Educational Research & Development) because I thought it would be a fun thing to do. Got some nice press. Then folks started to ask if I would share the technique. I was very surprised, but it seems that nobody had done one of these kind of maps for a campus, college, or university (nested, logical folders). Creative Commons Attribution 2.5 License seemed to be the way to go. And here you are. Enjoy.
This first write-up is a bit convoluted, so please share any corrections or suggestions you have here, and I will pass them on to others.
Notes
I have provided a template that is basically the Bowdoin map stripped down a bit so that you can easily swap out the names and descriptions of our buildings for yours
This is written from the Macintosh perspective, but everything is transferable.
Feel free to add or delete categories as it suits you.
It looks like there is a bit of an information overload, but we have found that it is helpful if people can view the map from whatever perspective they have - alumni, prospective students, etc. Letting folks slice and dice it from their personal perspective can be a big plus. In short, I think you can't have too much information - just be sure not to turn it all on, initially (more on that later).
Pardon my grammar.
Getting Started - Tools and Skills
It might seem like a long list, but it really is not - don't be intimidated.
- Google Earth Software version 3. (as of today 6/16/2006) stay away from the beta (v4- it is too buggy
- A computer that is strong enough to use Google Earth
- Basic HTML skills. This is the best book out there. This is the author's XML book
- Basic Photoshop skills.
- Passing knowledge of KML (Short for Keyhole Markup language - Keyhole was the name of the company before Google bought them).
- The KML Tutorial is OK.
- The KML Tutorial samples file is very helpful. It contains very straightforward examples.
Getting Started
Download these two files: campus-template-v.11.kml and link-to-campus-map.kml
 and
and 
campus-map-template is the file you will mostly be working in.
link-to-campus-map you will only need to open once, so let's start with that:
Open the file in a neutral text editor (I like BBEdit best, but their free version TextWrangler will work, too) and change the line of code <href>http://institution.edu/campus/maps/earth/kmz/your-college-campus.kmz</href> to the URL where your final KMZ file will live (KMZ is the compressed-zipped-format of KML). Then change everything that lives in the <description> </description> tag.
Why Two files?
This is very important. It is because this is the file that your users will
download to their desktops and will most likely keep there. If you want to
change anything on your map (and you will) it would be a huge pain (and unrealistic)
to ask all those users to re-download the KMZ file. This solution points
to a separate file that you can change whenever you want - and the content
will automagically update in their map. This is called a Network
Link.
Once you are done with these modifications, and you have a rough version of the file you are going to point to, you can open the link-to-campus file in Google Earth. From there, you should SAVE AS, and make sure you save it in KMZ format.
For your sys-admin to do in preparation of serving up these files:
KML Server requirements
When responding to a request from the Google Earth client, a KML server must follow a certain set of rules so that the client can correctly interpret responses.
Upon success, the server must return a response code of HTTP 200 and set the response's content-type to a suitable MIME type.
Google Earth reads KML and KMZ files, and the MIME types for these are:
application/vnd.google-earth.kml+xml kml
application/vnd.google-earth.kmz kmz
The body of the response must contain valid KML data, including the xml declaration header (<?xml version="1.0" encoding="UTF-8"?>). If the server returns invalid KML, the Network Link will stop deactivate and output an error message.
The Template
Open the campus-map-template file first in Google Earth to see what I have set up for you.
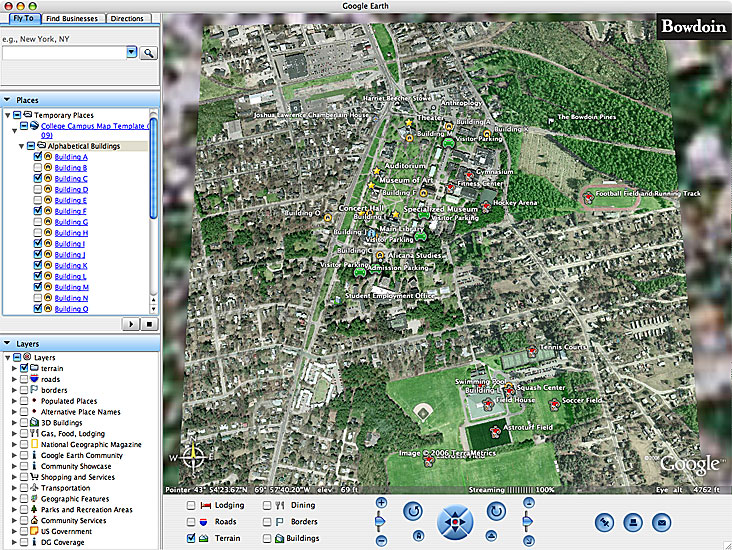
Click to Enlarge (click the enlarged image to close it)
You will notice that the section, Alphabetical Buildings is open. This was done so that novice users can get right to the
point. If you visit the actual Bowdoin Campus Map, you will be able to see the way we went about labeling things (alphabetically, that is)
When that section is closed, you can see what all the other categories are:

Click to Enlarge (click the enlarged image to close it)
Changing Them to be Your Points
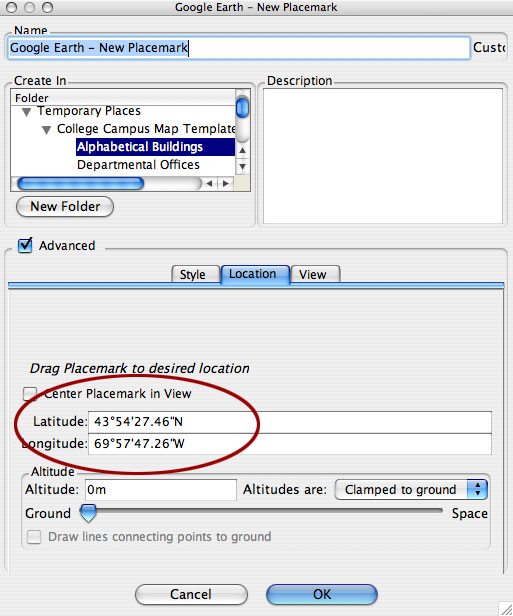
Open the map up and right-click (or control+click if you only have a one-button mouse) on Building A. Select Edit from the menu choices (please note that if you are using the beta, this has changed to "Get Info"). Click the Advanced check box. Then click the Location tab.
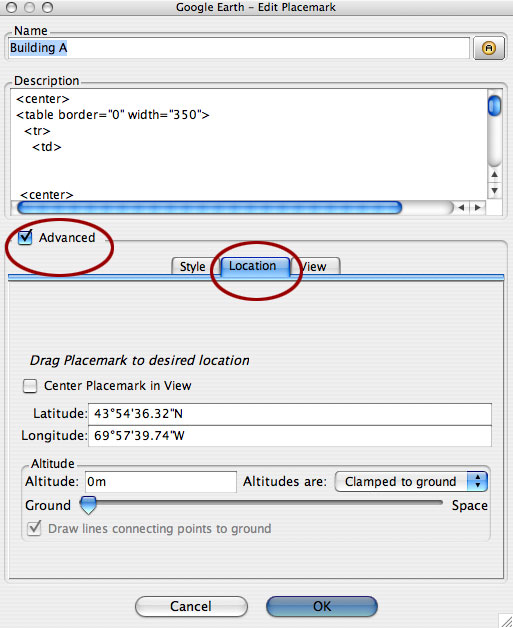
Click to Enlarge (click the enlarged image to close it)
You will be able to edit the information about Building A in the top pane and replace the Longitude and Latitude in the bottom pane. To get these numbers, simply zoom in on the location on YOUR map where you want the Placemark to be and got to the top menu. Add --> Placemark (Apple+N) and get the coordinates from the window, like this:
Click to Enlarge (click the enlarged image to close it)
Method 2 - The Low-Tech, Manual Way of Moving Your Points
Step 1- Moving the Placemarks
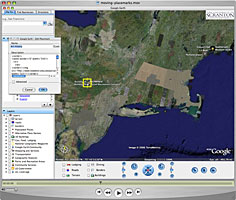
Simply right mouse click (or ctrl+click) on the placemark and move it - watch the movie, you will see what I mean.
Click to Watch QT Movie (be patient - it is a large file)
Step 2- Moving the Placemarks Closer
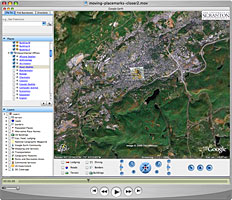
Same as above, only zoom in a bit and center each step - watch the movie, you will see what I mean.
Click to Watch QT Movie (be patient - it is a large file)
Here is a link to some tips for creating placemarks »
and a Flash movie with more »
The Background Overlay
Why did I use a background overlay? Because the resolution of the satellite maps that Google Earth has for our area is awful. I got the better image from our Town Planners office. They had done a fly-over to assess tax lots and the resolution was quite good - I had to dumb i down a bit, as it was a huge file. As the image was in the public domain, they had no problem giving it to me to use. Nice folks.
Click to Enlarge (click the enlarged image to close it)
Edit it the same way you edit a Placemark. Here is a link to a flash movie with tips »
note: there are some sizes that cannot be seen, as they
overload most video cards »
The Map Stucture
First there is your intro
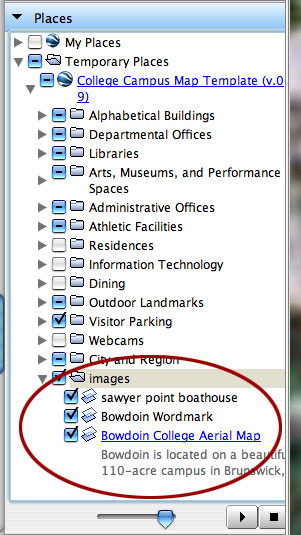
Alphabetical list - everything
I recommend leaving this folder open
Departmental offices
pretty straight forward
keep these turned off - this is for people to find when they are digging to
the 2nd level of the map - they should essentially be redundant with the alphabetical
anyway
Arts, Museums, and Performance Spaces
please note that the icons are at a slightly higher level for when you are
viewing the campus at an angle or from the side.
Administrative Offices
Business related offices on campus
again, all off to start - for the person looking down to the next level
The rest seems to be self-explanatory....
Publishing
When you have placed all of your map points and have your text set, save both files in KMZ format (compressed) and place on your web server.
Some Additional Suggestions
Keep your icons and map label text small - you have them at the default size, they will look awful in a dense setting (like a campus). Look at the settings of my links to see what I mean.
Many of the images in this maps balloons will look blurry to you - that is because they were originally smaller and are being "expanded" by the HTML tag img width="325". Let this be a lesson to you that you need to properly size your images (in Photoshop, or the like). Do not use the code to do it for youor your pictures will look bad, too.
In Google Earth version 3 you right click and "edit" in version
4 it seems that you "get info".
I tried using the beta, but it is way too unstable, even for me.
I am Confused
Where to get help
1) Me. Happy to chat, if I have the time. email.
2) Google
Earth BBS - not a great interface, but there is a lot of stuff there, especially
in terms of user-generated tutorials
Advanced - See Everything in Your Map on One Web Page
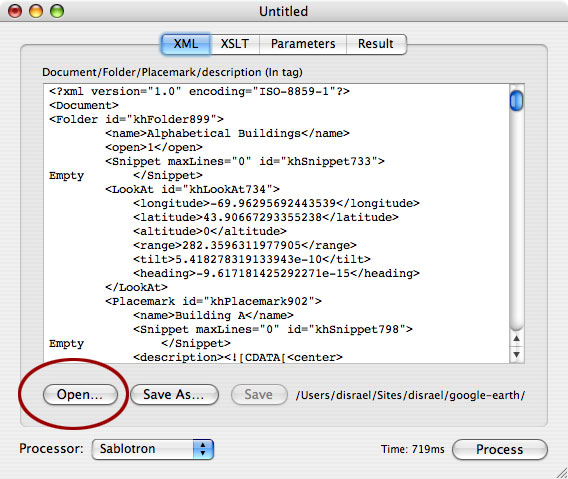
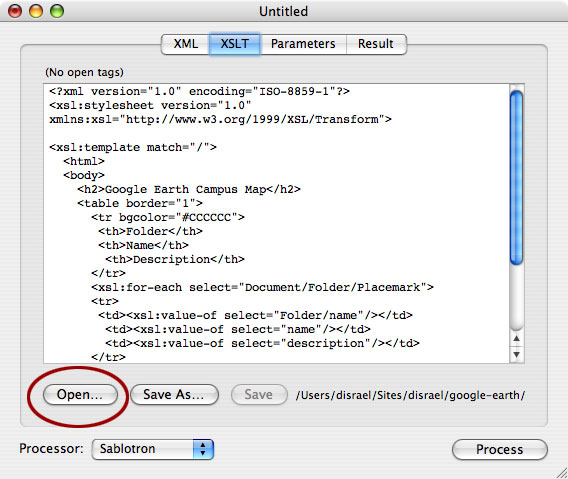
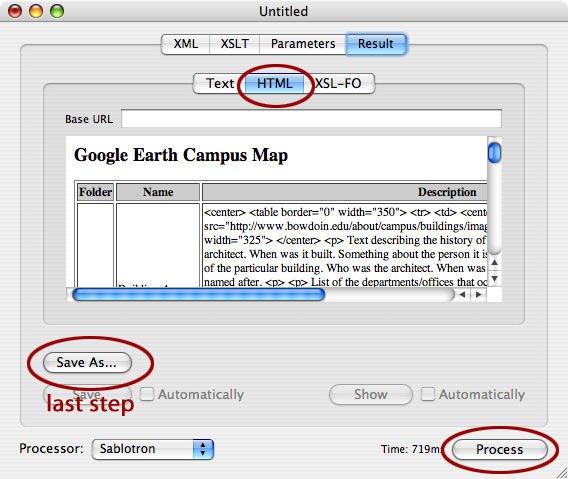
You can do an XSLT Transformation on your file so that it gets spit out as web page - very helpful if you have copy editor or communications department that want to see all of your material. I find it helpful for proofreading.
I use BBEdit as an editor and a test/transform application from the brilliant Marc Liyanage called TestXSLT. There are others - and probably easier methods.
The stylesheet you will run it through with is here and looks like the code below » transform-google-earth-map.xsl
<?xml version="1.0" encoding="ISO-8859-1"?>
<xsl:stylesheet version="1.0"
xmlns:xsl="http://www.w3.org/1999/XSL/Transform">
<xsl:template match="/">
<html>
<body>
<h2>Google Earth Campus Map</h2>
<table border="1">
<tr bgcolor="#CCCCCC">
<th>Folder</th>
<th>Name</th>
<th>Description</th>
</tr>
<xsl:for-each select="Document/Folder/Placemark">
<tr>
<td><xsl:value-of select="Folder/name"/></td>
<td><xsl:value-of select="name"/></td>
<td><xsl:value-of select="description"/></td>
</tr>
</xsl:for-each>
</table>
</body>
</html>
</xsl:template>
</xsl:stylesheet>
The Steps
In the kml file change the document type kml to xml
change
<?xml version="1.0" encoding="UTF-8"?>
to
<?xml version="1.0" encoding="ISO-8859-1"?>
make sure it is all the way at the top (no line breaks before it)
Remove
<kml xmlns="http://earth.google.com/kml/2.0">
Remove <kml> at top
and </kml> at bottom
remove all text (after <Document> down to the the first <Folder> tag
<Folder id="whatever you have here">
i.e. all the styles
It is a lot of text - a couple of hundred lines - I will clean
this up in the next version, but I find it easy to search for the first <Folder>
and cut all the text up to the top (almost) from there.
I preserve the name and description by adding <Folder><Placemark> </Placemark></Folder>< (before <name> and
after <description> for the purposes of proofreading (it makes it easier
to have in one document), but in this example, that information will be supplied
in the Network Link (that you saw above).
Run it through the transformer and the HTML page will look like this » campus-template-v.11.html
Here are the steps to complete the transformation, visually:
Click to Enlarge (click the enlarged image to close it)
It is pretty ugly, so you should clean it up by doing the following search and replace:
< is replaced by <
and
> is replaced by >
Now the clean, finished HTML
page will look like this » campus-template-v.11-clean.html
Much better.
The End
Please keep the comments and questions coming.
Extra special thanks to Selby for help with kaapee ededing.
Google Earth Icons: How to do the Math »
Google Earth Movie: 3D Buildings on a Campus »
Google Earth to Google Maps: Conversion of Data to Be Browser Accessible »
Bowdoin Personal Projects Page »
![]()
Except where otherwise noted, this site is
licensed under a Creative Commons Attribution 2.5 License